Displayr supports Single Sign-On (SSO) to allow users to log in without needing another password. When Single Sign-On is enabled, then your company's password system decides who can use Displayr, and which dashboards they can see. This article discusses:
- Requirements
- An Overview of How SSO Works
- Setup for your password system ("Identity Provider", "IdP")
- Setup in Displayr ("Service Provider", "SP")
- Groups
- Mixed types of users
- User id attributes checked
- User name attributes checked
Requirements
- A Displayr Enterprise account without SSO already configured (each account can only have one SSO).
- Your company has a subdomain (e.g., mycompany.displayr.com). If you don't have one, please contact Displayr support. This is the URL that your SSO users will use to sign into Displayr, if not trying to access a document directly.
- You are a Displayr administrator. (You are in the Administrators group in Displayr.)
- Your company's password system ("Identity Provider" or IdP) supports SAML2.0 SP initiated Web Browser Single Sign-On (also known as the "SP Redirect Request; IdP POST Response" profile). You will need help from an administrator of that system.
- You understand How to Manage User Groups and Permissions in Displayr.
An Overview of How SSO Works
Each Displayr company account can be configured for one SSO. We provide information about Displayr to give to your IdP so they can allow Displayr to access the SSO information. Once the IdP has authorized us, they will provide you a text Certificate to add to your Displayr SSO configuration. They will also need to provide a Login URL where Displayr can log in SSO users. You can manage permissions for individual User Groups automatically or manually. If you'd like to automatically assign users a Displayr User Group via your SSO, your IT team will need to provide a Group Identifier for the SSO Group mappings (explained below). Otherwise, you will need to manually assign an SSO user to the group after they have logged in for the first time. Take note that users already in the system will have a new SSO user created when they sign into Displayr through SSO for the first time, so their licenses and user groups do not carry over from their old user login. More details on configuring your SSO are in the Method section below.
After SSO has been enabled, users can go to your subdomain URL (https://subdomain.displayr.com) to log in directly, or they can try to access a document in edit mode or a dashboard that requires login (both of which will redirect them to your subdomain to log in). The subdomain login page will automatically redirect to the Login URL provided and pass an authorization request to the SSO to log them in automatically. After being logged in, they will be taken to the Documents page or whatever document they were trying to access (as determined by the Displayr User Group assigned to their SSO User). If they want, they can log out of Displayr, which will take them to the SSO Logout URL provided. This can be any URL you want to redirect to and will not necessarily (unless set up that way) automatically log them out from their SSO system. If left blank, they'll be taken to http://app.displayr.com/. Displayr still allows non-SSO users to log in. See the Mixed types of users section below for more details.
Method
Setup for your password system ("Identity Provider", "IdP")
To set up your Identity Provider, you will need some information about the Service Provider (Displayr).
- Ensure you have a subdomain set up for you, e.g., mycompany.displayr.com. If not, please contact Displayr support to have this set up for you before you continue these steps.
- In Displayr: click on the initials icon at the top right and then select Account settings from the dropdown.
- On the Account Settings page, select the Settings tab.
- Scroll down and click on Configure Single Sign On (SAML).
- The information needed to configure the identity provider is under the Service Provider Information heading on this page.
- If your identity provider takes an SP metadata XML file, a preconfigured one for your company can be downloaded by clicking Download Metadata xml file on this page.
Microsoft Azure Active Directory
If you are using Microsoft Azure Active Directory, see Tutorial: Integrate Displayr with Microsoft Entra ID for detailed instructions.
Please note that Azure Active Directory does not support sending user groups for users who are part of more than 150 groups in their EntraID platform. See the following page for more information on this and how to avoid the problem: Configure group claims for applications by using Microsoft Entra ID
Okta
If you are using Okta, see Add a private SSO integration for instructions on how to set up the private SSO integration in Okta.
When configuring the integration in Okta, in the Single Sign On URL field, enter the Assertion Consumer Service (ACS) URL. You can find this URL in your SSO settings in Displayr near the top in the Service Provider Information section. If you do not enter the full ACS URL in Okta, your users will be stuck in a loop each time they attempt to log in.
Then, in the Audience URI (SP Entity ID) field, use the EntityID found just above the ACS URL in your Displayr SSO settings. Finally, in the Name ID Format field, pull in one of the user name attributes listed below in this article: User id attributes checked.
Setup in Displayr ("Service Provider", "SP")
- In Displayr: click on the initials icon at the top right and then select Account settings from the dropdown.
- On the Account Settings page, select the Settings tab.
- Scroll down and click on Configure Single Sign On (SAML).
- On the next page, ensure that Enable Single Sign On (SAML) is selected.
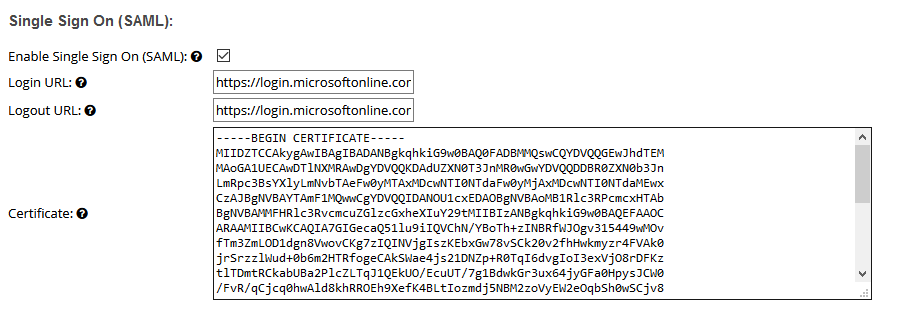
- Under the heading Single Sign On (SAML) you will need to fill in some information from your Identity Provider:
- Login URL - this is the login page for your IdP, where Displayr will redirect and pass along the authentication request so you are automatically logged in.
- Logout URL - this is optional. It is the URL that you want your SSO users to be redirected to when they log out of Displayr. If your IdP has a logout page that automatically logs users out of the system, you can put that here if you wish. Otherwise, they will be redirected to app.displayr.com.
- Certificate - this is the certificate provided by the IdP to verify the signed SAML assertion response. You need to paste in PEM format.
- After all configuration has been done, check Enable Single Sign On (SAML) and click Save.
Here is an example of what the settings might look like once completed:
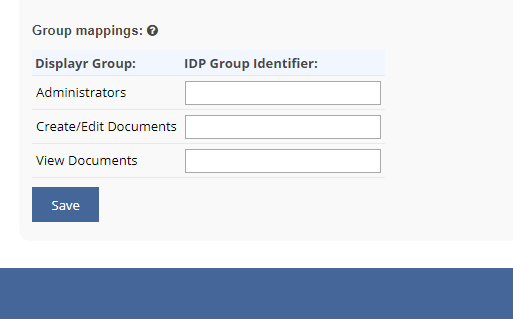
Users will be assigned to and removed from groups in Displayr based on the groups given on your company's password system. Displayr User Groups control which dashboards each user can see. Your company's password system administrator must supply the codes for each security group that should be matched to Displayr. Any groups that are left blank here will be ignored by Single Sign-On and must be managed manually in Displayr.
Each time a user logs into Displayr using SSO, we re-synchronize their groups with the IdP by:
Removing them from any groups that have a mapping in this table where the identifier was not present in the response from the IdP.
Adding them to any groups that have a mapping in this table where the identifier was present in the response from the IdP.
Any groups that do not have a mapping setup in this table are left as is.
For a successful SSO login, Displayr extracts which groups the user should be in from the SAML response by:
- Looking for all saml:Attribute nodes in the response with the name groups or http://schemas.microsoft.com/ws/2008/06/identity/claims/groups.
- For each matching node found, all nested saml:AttributeValue nodes are checked and should contain one IDP Group Identifier each.
- All of these IDP Group Identifiers are then compared against the Group mappings table in your Displayr Account Settings > Settings > Configure Single Sign On (SAML) to determine which Displayr groups the user should be in.

Manual group management
If you want to control which SSO users are in a User Group manually, do not provide an IDP Group Identifier set up in the Group mappings table. You will need to manually assign users to them once they have signed in via SSO at least once. If you have a mapping for a User Group in the table, you must use the SSO system to manage which SSO users are included in that group. That is, you can manually add SSO users to that group temporarily, but upon logging out and back in, the mapped group's permissions will be reset based on the SSO system.
Additional Details
Displayr will attempt to re-login SSO users every 24 hours by default, but will also respect the "SessionNotOnOrAfter" attribute if present in the SAML response
Mixed types of users
Displayr allows a mixture of manually-configured users (identified with e-mail addresses and passwords, as normal) and users who come in via Single Sign On.
- Single Sign On users will only appear in the Displayr Users list after successfully logging in.
- If you also have non-SSO logins, you can log in to those using either app.displayr.com or mycompany.displayr.com/Login/Direct. If you have regional servers, note that instead of app you should use your region's URL, e.g., australiaeast.displayr.com.
- Either type of user can be manually put in any Displayr group. Further, Single Sign On users will be automatically added to or removed from groups each time they log in, according to your company's password system.
User id attributes checked
Displayr extracts the user's id in this priority order from saml:Attributes with the following names (case sensitive):
- User.email
- emailaddress
- http://schemas.xmlsoap.org/ws/2005/05/identity/claims/User.email
- http://schemas.xmlsoap.org/ws/2005/05/identity/claims/emailaddress
- http://schemas.xmlsoap.org/ws/2005/05/identity/claims/mail
- saml:NameID attribute within the saml:Subject attribute
User name attributes checked
- first_name
- givenname
- User.FirstName
- FirstName
- http://schemas.xmlsoap.org/ws/2005/05/identity/claims/first_name
- http://schemas.xmlsoap.org/ws/2005/05/identity/claims/givenname
- http://schemas.xmlsoap.org/ws/2005/05/identity/claims/User.FirstName
- http://schemas.xmlsoap.org/ws/2005/05/identity/claims/FirstName
For the Last Name, Displayr checks for a saml::Attribute with any of the following names and takes the first match:
- last_name
- surname
- User.LastName
- sn
- LastName
- http://schemas.xmlsoap.org/ws/2005/05/identity/claims/last_name
- http://schemas.xmlsoap.org/ws/2005/05/identity/claims/surname
- http://schemas.xmlsoap.org/ws/2005/05/identity/claims/User.LastName
- http://schemas.xmlsoap.org/ws/2005/05/identity/claims/sn
- http://schemas.xmlsoap.org/ws/2005/05/identity/claims/LastName
Next
How to Invite New Users to Your Displayr Account
